Enhance Customer Communication: The Complete Guide to Zotabox Contact Form Builder for Shopify Merchants
Why a Contact Form is Essential for Shopify Stores
In e-commerce, seamless communication between merchants and customers can significantly improve customer satisfaction and boost sales. One of the most effective ways to achieve this is by integrating acontact formdirectly into your Shopify store. This ensures customers can easily reach out for inquiries, support, or feedback without leaving your website.
This is where Zotabox Contact Form Builder comes in — a simple yet powerful app designed specifically for Shopify merchants to create, customize, and display professional contact forms in minutes.
What is Zotabox Contact Form Builder?
Zotabox Contact Form Builder is a versatile Shopify app that allows merchants to add customizable contact forms to their online stores. With its user-friendly interface and diverse customization options, merchants can design forms that match their branding while ensuring optimal functionality on both desktop and mobile devices.
Key Features of Zotabox Contact Form Builder
Fully customizable form fields, backgrounds, and text styles.
Pre-built custom fields (text, dropdowns, radio buttons, etc.) to collect specific information from customers.
Easy-to-add attachment upload option, allowing customers to send files directly through the form.
Flexible display rules to control when and where the form appears.
Embed form directly into any page or trigger it via a floating contact tab.
Works seamlessly across devices (desktop, tablet, mobile).
Step-by-Step Guide to Setting Up Zotabox Contact Form Builder
Step 1: Install Zotabox Contact Form Builder from Shopify App Store
Visit the Shopify App Store and search for “Zotabox Contact Form Builder.”
Click Install and authorize the app to connect with your Shopify store.
Once installed, log into the Zotabox dashboard, where you can begin configuring your contact form.
Step 2: Customize Form Fields
In the Customize Fields tab, enter your recipient email address, ensuring all submissions are forwarded to your preferred inbox.
Add or remove form fields to suit your store’s needs. Available options include:
Name
Email Address
Subject
Message
Custom fields (dropdown, text, date selection, etc.)
Enable file attachment if you want customers to submit images or documents directly through the form.
Add optional fields like department selection if you want to direct inquiries to specific teams (e.g., sales, support).
Step 3: Customize Form Appearance
Switch to the Customize Form tab to modify the appearance of your contact form.
Choose a background image from the library, or upload your own.
Adjust overlay color to improve readability.
Customize text styles, including font type, size, and color for form labels, descriptions, and buttons.
Preview changes in real-time to ensure a cohesive design that fits your store’s branding.
Step 4: Configure the Contact Tab
In the Customize Tab section, configure the floating contact tab that triggers the form.
Choose tab position (left, right, or bottom).
Select tab style (gradient, flat, bordered) and adjust the text size.
Customize the tab text or upload an image to use as the tab icon.
Optional: Disable the tab if you prefer to only use the embedded form.
Step 5: Embed Form into Specific Pages (Optional)
If you prefer embedding the form directly onto specific pages (e.g., Contact Us page), switch to the Embed Form tab.
Copy the embed code and paste it into your desired page’s HTML.
You can also copy a direct link (URL) to trigger the form from your store’s menu or footer.
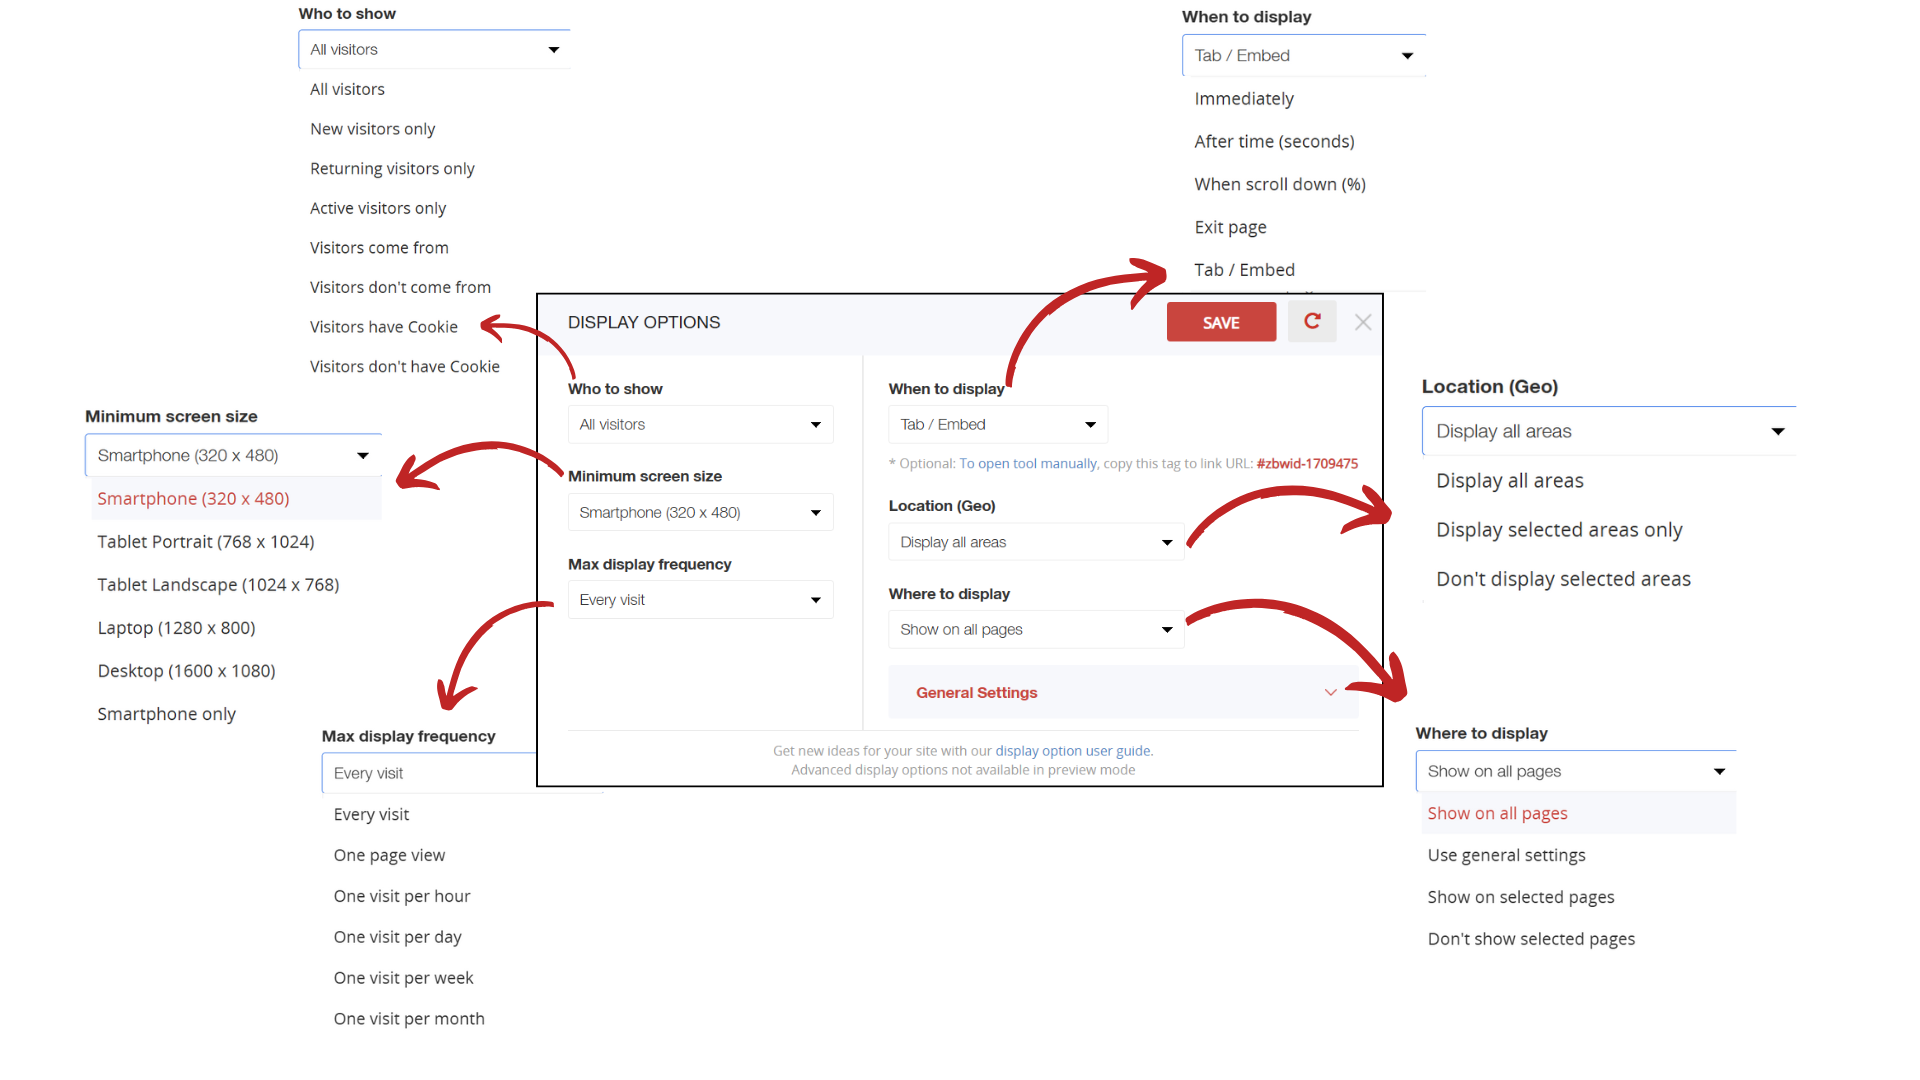
Step 6: Set Display Rules
In the Display Options tab, set rules to control when and where the contact form appears.
Options include:
Who to Show – All visitors, new visitors, or returning customers.
Minimum Screen Size – Specify whether the form displays only on mobile, tablet, or desktop.
Max Display Frequency – Choose to show the form every visit, once per day, or less frequently.
Where to Display – Display on all pages, only selected pages, or exclude specific pages.
Location (Geo) – Limit visibility to visitors from selected countries or regions.
Step 7: Save and Publish
After customizing all elements and setting display rules, click Save.
Visit your store to preview the form’s appearance and test its functionality.
Make adjustments as needed to ensure optimal performance and a seamless customer experience.
Best Practices for Using Zotabox Contact Form Builder
Keep it Simple – Only ask for essential information to reduce form abandonment.
Match Your Branding – Customize colors and fonts to maintain a consistent brand image.
Set Clear Expectations – Use your form description to tell customers how long they should expect to wait for a response.
Test Across Devices – Ensure your form works perfectly on desktop and mobile.
Why Zotabox Contact Form Builder Stands Out for Shopify Merchants
No coding required, making it accessible for all merchants.
Extensive customization options for both design and functionality.
Flexible display rules that fit various marketing and operational strategies.
Real-time preview, ensuring merchants can see changes instantly.
Multi-purpose functionality — works for customer inquiries, order support, feedback collection, and more.
Final Thoughts
Zotabox Contact Form Builder offers Shopify merchants a seamless, customizable way to enhance customer communication and capture valuable leads. Whether you want to create a dedicated Contact Us page or add a convenient floating contact tab, this app gives you the flexibility to build the perfect contact experience for your store.
Install Zotabox Contact Form Builder today and start transforming customer inquiries into lasting relationships.
Sign up today and chat with us to claim 2-months of free full access to all Zotabox premium tools and elevate your marketing game!
Our team features developers with over 20 years of tech and e-commerce app experience, alongside marketers with 10+ years of expertise. We provide top insights to help you optimize conversions and increase revenue on e-commerce platforms.